


Digital advertising is the backbone of online publishing, and one of the most critical components of this ecosystem is the Google Ad Manager Ad Selection process. Every time a user visits a site or app, Google Ad Manager decides — in a matter of milliseconds — which ad to show. This decision balances advertiser goals, publisher revenue, and user experience. Understanding how this process works helps both publishers and advertisers optimize their strategies.
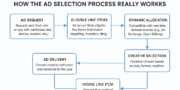
1. How the Ad Request Starts
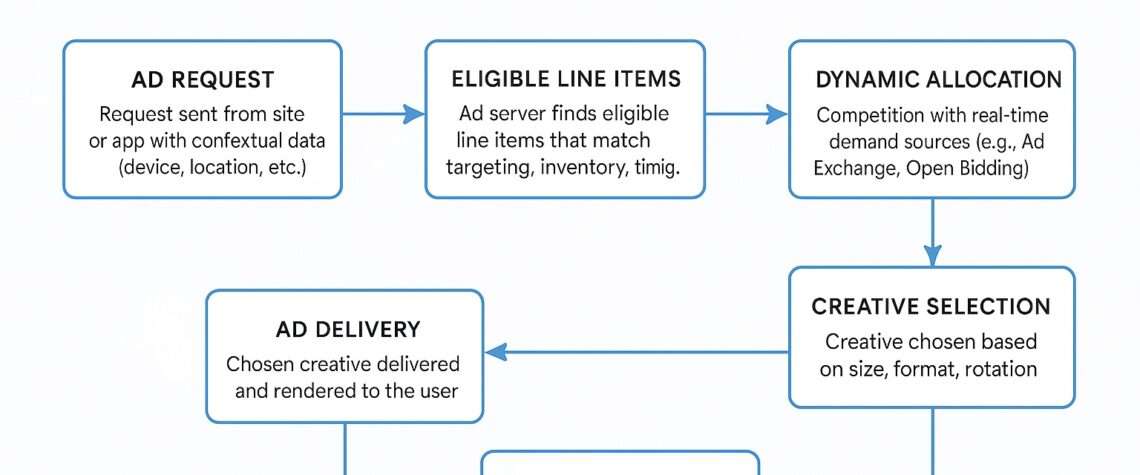
The Google Ad Manager Ad Selection journey begins with an ad request. When a visitor lands on a webpage or opens an app, the ad tag triggers a request to the ad server.
This request includes:
- Device and browser information
- Location signals such as IP address
- Audience and targeting parameters
- Details of the ad slot (size, format, placement)
With this data, the server identifies which line items might be eligible to serve an ad.
2. Determining Eligible Line Items
The next step is filtering out line items that don’t match the request. Eligibility is based on:
- Targeting rules (location, demographics, devices)
- Frequency caps (limits on ad exposure per user)
- Time and date restrictions
- Format and size compatibility with the ad slot
Only those line items that perfectly fit the request move forward in the ad selection process.
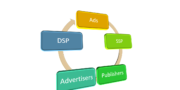
3. Competition Through Dynamic Allocation
At this stage, Google Ad Manager Ad Selection becomes competitive. Eligible line items are compared against external demand sources such as:
- Google Ad Exchange (AdX)
- Open Bidding partners
- Programmatic buyers
Dynamic allocation ensures real-time competition. The winning ad is not always the direct-sold campaign but the one that offers the best value for both the publisher and the advertiser.
4. Creative Selection and Rotation
After a winning line item is chosen, Google Ad Manager must select the creative to deliver. A campaign may include multiple creatives, so the system evaluates:
- Size and format compatibility
- Avoiding duplicate creatives on the same page
- Rotation rules (even, weighted, optimized, sequential)
- Ad policy and safety compliance
This step ensures the creative not only fits technically but also aligns with campaign strategy.
5. Fallback: House Line Items
When no paid ad qualifies, publishers rely on house line items. These serve as fallback ads, often promoting the publisher’s own content, services, or products. They are considered zero-value ads, but they prevent wasted impressions and maintain a filled ad space.
6. Delivery and Rendering
Finally, the selected creative is delivered and rendered to the user’s device. Tracking and measurement pixels fire to record impressions, clicks, and engagement. This completes the Google Ad Manager Ad Selection cycle.
Why Understanding Ad Selection Matters
For publishers, mastering the Google Ad Manager Ad Selection process provides several benefits:
- Better optimization of line item priorities
- Smarter use of frequency caps and targeting
- Increased revenue from dynamic allocation and competition
- Reduced risk of wasted impressions through fallback logic
For advertisers, it ensures transparent competition and efficient audience targeting.
Conclusion
The Google Ad Manager Ad Selection process may be invisible to users, but it is the engine powering modern digital advertising. By understanding how ad requests, eligibility, competition, and creative selection work together, publishers and advertisers can optimize strategies for maximum efficiency and revenue.